centostricks
Just another WordPress.com site
Category Archives: nsclient
Nagios Client Nsclient++ Installation (Applies for Windows Clients)
Posted by on August 15, 2011
1.0 Nagios Client Nsclient++
NSClient++ is an open source windows service that allows performance metrics to be gathered by Nagios for windows services.
1.1. Overview
Following three steps will happen on a very high level when Nagios (installed on the nagios-server) monitors a service (for e.g. disk space usage) on the remote Windows host.
- Nagios will execute check_nt command on nagios-server and request it to monitor disk usage on remote windows host.
- The check_nt on the nagios-server will contact the NSClient++ service on remote windows host and request it to execute the USEDDISKSPACE on the remote host.
- The results of the USEDDISKSPACE command will be returned back by NSClient++ daemon to the check_nt on nagios-server.
Following flow summarizes the above explanation:
Nagios Server (check_nt) —–> Remote host (NSClient++) —–> USEDDISKSPACE
Nagios Server (check_nt) <—– Remote host (NSClient++) <—– USEDDISKSPACE (returns disk space usage)
1.2. Setup nagios on remote windows host
1.2.1. Install NSClient++ on the remote windows server
Download NSclient++ from NSClient++ Project.
Once you download the Nsclient++, Click on the msi file to start installation
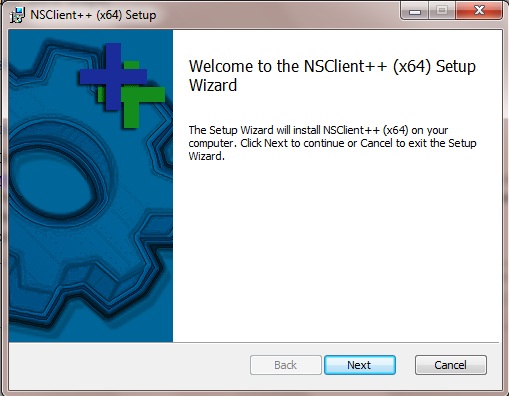
Go through the following 5 NSClient++ installation steps to get the installation completed.
(1) NSClient++ Welcome Screen
(2) License Agreement Screen

(3) Select Installation option and location. Use the default option and click next. > S
(4) Specify the Allowed IP list, this will be the nagios server ip from which connection should be allowed
(5) Ready to Install Screen. Click on Install to get it started.
(6) Installation completed Screen.
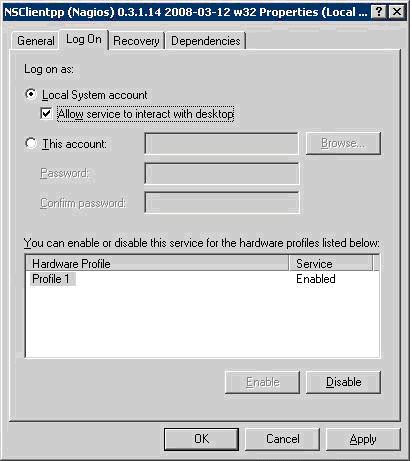
1.2.2 Modify the NSClient++ Service
Go to Control Panel -> Administrative Tools -> Services. Double click on the “NSClient++ service and select the check-box that says “Allow service to interact with desktop” as shown below.
1.2.3 Start the NSClient++ Service
Start the NSClient++ service either from the Control Panel -> Administrative tools -> Services -> Select “NSClient++″ and click on start (or) Click on “Start -> All Programs -> NSClient++ -> Start NSClient++. Please note that this will start the NSClient++ as a windows service.
Later if you modify anything in the NSC.ini file, you should restart the “NSClient++″ from the windows service.
1.2.4 Whitelist the Nsclient++ Service in the Windows Firewall
1.3. Configuration steps on Nagios Server
1.3.1. Verify check_nt command and windows-server template
Verify that the check_nt is enabled under
/usr/local/nagios/etc/objects/commands.cfg
# ‘check_nt’ command definition
define command{
command_name check_nt
command_line $USER1$/check_nt -H $HOSTADDRESS$ -p 12489 -v $ARG1$ $ARG2$
}
Verify that the windows-server template is enabled under /usr/local/nagios/etc/objects/templates.cfg
# Windows host definition template – This is NOT a real host, just a template!
define host{
name windows-server ; The name of this host template
use generic-host ; Inherit default values from the generic-host template
check_period 24×7 ; By default, Windows servers are monitored round the clock
check_interval 5 ; Actively check the server every 5 minutes
retry_interval 1 ; Schedule host check retries at 1 minute intervals
max_check_attempts 10 ; Check each server 10 times (max)
check_command check-host-alive ; Default command to check if servers are “alive”
notification_period 24×7 ; Send notification out at any time – day or night
notification_interval 30 ; Resend notifications every 30 minutes
notification_options d,r ; Only send notifications for specific host states
contact_groups admins ; Notifications get sent to the admins by default
hostgroups windows-servers ; Host groups that Windows servers should be a member of
register 0 ; DONT REGISTER THIS – ITS JUST A TEMPLATE
}
4.3.2 . Uncomment windows.cfg in /usr/local/nagios/etc/nagios.cfg
# Definitions for monitoring a Windows machine
cfg_file=/usr/local/nagios/etc/objects/windows.cfg
4.3.3. Modify /usr/local/nagios/etc/objects/windows.cfg
By default a sample host definition for a windows server is given under windows.cfg, modify this to reflect the appropriate windows server that needs to be monitored through nagios.
# Define a host for the Windows machine we’ll be monitoring
# Change the host_name, alias, and address to fit your situation
define host{
use windows-server ; Inherit default values from a template
host_name remote-windows-host ; The name we’re giving to this host
alias Remote Windows Host ; A longer name associated with the host
address 192.168.1.4 ; IP address of the remote windows host
}
4.3.4. Define windows services that should be monitored.
Following are the default windows services that are already enabled in the sample windows.cfg. Make sure to update the host_name on these services to reflect the host_name defined in the above step.
define service{
use generic-service
host_name remote-windows-host
service_description NSClient++ Version
check_command check_nt!CLIENTVERSION
}
define service{
use generic-service
host_name remote-windows-host
service_description Uptime
check_command check_nt!UPTIME
}
define service{
use generic-service
host_name remote-windows-host
service_description CPU Load
check_command check_nt!CPULOAD!-l 5,80,90
}
define service{
use generic-service
host_name remote-windows-host
service_description Memory Usage
check_command check_nt!MEMUSE!-w 80 -c 90
}
define service{
use generic-service
host_name remote-windows-host
service_description C:\ Drive Space
check_command check_nt!USEDDISKSPACE!-l c -w 80 -c 90
}
1.3.5. Verify Configuration and Restart Nagios.
Verify the nagios configuration files as shown below.
[nagios-server]# /usr/local/nagios/bin/nagios -v /usr/local/nagios/etc/nagios.cfg
Total Warnings: 0
Total Errors: 0
Things look okay – No serious problems were detected during the pre-flight check
Restart nagios as shown below.
[nagios-server]# /etc/rc.d/init.d/nagios stop
Stopping nagios: .done.
[nagios-server]# /etc/rc.d/init.d/nagios start
Starting nagios: done.
Verify the status of the various services running on the remote windows host from the Nagios web


Recent Comments